Generating Excel File in Angular 9 using “ExcelJs” with Custom Font Family | Devstringx
Creating A New Angular Project
Let’s create a new Angular project using the Angular CLI tool by running/executing the following angular CLI command
- ng new export-to-excel
- Would you like to add Angular routing? Yes
- Which stylesheet format would you like to use? SCSS
What’s ExcelJS?
ExcelJS is the Javascript library used to read, write and manipulate the excel spreadsheet data and styles to JSON and XLSX. We can create XLSX files easily with formatted headers, footers, and cells, and input any custom data including text, images, etc. It’s an active and community-driven library with many features.
Features of ExcelJS
Here are some of the awesome features of Excel JS:-
- View, Add, Remove, Access Worksheets, and also set the Worksheet States like hidden, visible, and veryHidden.
- Page setup of a worksheet includes orientation, margins, height, width, and print area.
- Headers and Footers configuration of the worksheet with custom style, font, color, etc.
- Worksheet Views to Freeze & Split sections.
- Merging the group of cells or Handling individual cells.
- Cell level data validation support.
- Tables and Comments on worksheets.
- Customized styling includes fonts, fill, border, alignment, size, gradient fills, etc.
- Images in the worksheet can be added using the addImage() function.
- File Input Output for Reading and writing of CSV & XLSX.
- ES5 Support, can be used in the simple HTML pages for some reactive applications like Angular, React, .Net, Java and NodeJS.
Install ExcelJs
To install the ExcelJs package execute the following command, which is the main player to deal with Excel format-related functionalities we want to achieve
- npm install –save exceljs@1.12.0
For more info or reference, you can check https://www.npmjs.com/package/exceljs this link.
Install FileSaver
We require FileSave.js to deal with operations like saving files on the disk. It is mainly used in web applications to store large files in the system.
Run the following command to install the file-saver
- npm install –save file-saver
Configure tsconfig.json
Open the tsconfig.json file at the project root, then add the “paths” property under the “compiler options” with “ExcelJs” library location
Create a Service For ExcelJs
Now we’ll create a new service to keep the Excel-related method in one place so that we don’t have to write the whole code again and again for one functionality. To generate an excel service in the service folder execute the following command.
- ng generate service services/excel
This will create an ExcelService under the services folder
Update the ExcelService
Now open the excel.service.ts file inside the services folder and make the following changes:
import { Workbook } from ‘ExcelJs’;
import * as fs from ‘time-saver;
We will create a separate method in excel.service.ts called generate excel().
Now we will give Title to the excel File Like “User Data”
So, we will just declare a variable named Title and give value to it.
const title = ‘User Data’
now, we will set the header and values of the column randomly
let’s suppose we have a JSON like
For setting the header randomly from keys of JSON, we will use
const header = Object.keys(userList[0])
This will take all the keys from the 0 index from the JSON and then the Object.keys() method will return the keys of the 0 index from the JSON into the header variable in the form of an array.
Create Workbook and Add Worksheet
Create a new workbook and add a new worksheet using add worksheet() method of Workbook.
const workbook = new Workbook()
const worksheet = workbook. add worksheet(‘User Report’)
Add Row and Format the Fonts
Now, we want to use the “Custom Font” Family in the excel file so first, we will download the custom font from the web. For example, I want to use Saysettha OT font in our excel file so I will download this font from https://laoscript.net/download/ this link.
Note: You can download any font from any website, you just need to install it in the system, we will tell you how to install the font in the system below
After downloading the font, let’s install the font in the system
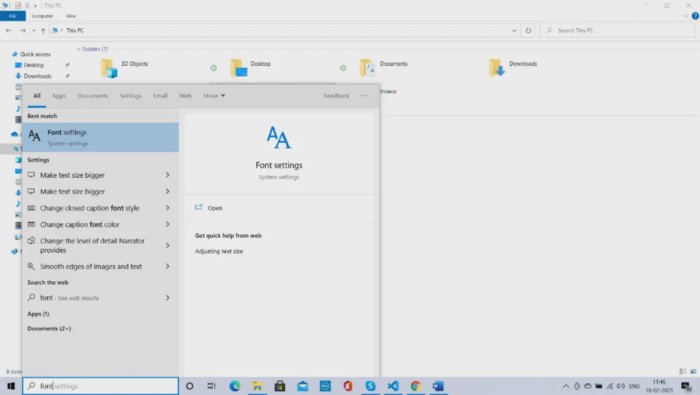
- Search Font Settings in the search bar
2. Now drag and drop the download file below the Add fonts section
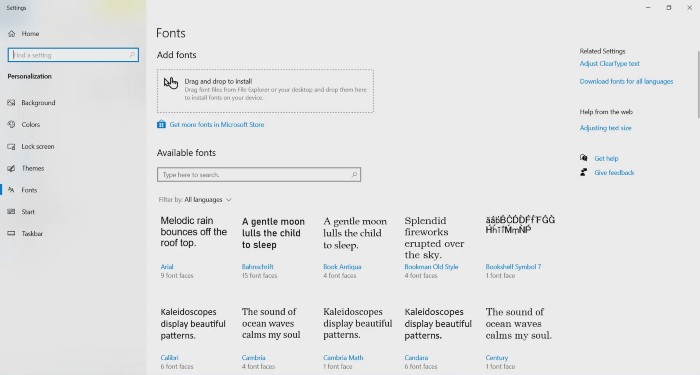
After dropping the font file, the system will automatically install the font in the system and you can check this font in the excel sheet in the font dropdown.
Adding Custom Font to the Project
- Go inside the assets folder inside the app folder
- Create a folder named excel font
- Copy and paste the download font file inside the excel font folder, it will look like this

4. Now we have to add a font face to bind the download file with a name so that we can use it in the entire application
5. Go to the index.html page and then add
It will look like this

Let’s Resume to the excel.service.ts now
1. Let’s add a title row with our custom font
It will add a row with the title that we have provided above with our custom font family, here the name represents the name of the font family that we want to use in the excel file, we have added our custom font with the font-face Saysettha OT.
Note: Make sure you must enter the exact value in the name that you have entered in the font-family attribute inside the @font-face
2. Adding Header in a new row with custom font
Note: you must give a custom font to every row
3. Add Data in excel with custom font
Export File Using FileSaver
Your final code will look like this
app.component.ts
app.component.html
 excel.service.ts
FAQs
1) How to Use Excel JS In Angular?
Here’s how to import and export Excel spreadsheets in Angular.
- Install the SpreadJS component in your application
- Instantiate a SpreadJS component
- Create an input element that accepts an XLSX file
- Add the import code
- Add the export code
2) How to Read Data from an Excel File In Angular 12?
// Create workbook object let wb:Workbook = new Workbook(); The Workbook object must use readFile and file types. where xlsx is the file type. Create a prompt to get a value from the workbook, then block and fix it.
3) How to Download an Excel File From the Assets Folder in Angular?
To download an item, follow these steps:
- Click on the logo in the upper left corner
- On the browse page, click Assets > Files
- Navigate to the folder containing the resource you want to download
- Select a folder or select one or more assets in a folder
- Click Download on the toolbar
If you are interested in even more development-related articles and information from us here at Devstringx, then we have a lot to choose from.
Original Source:- Click Here
Comments
Post a Comment